
How to Install an Aftermarket Track
Unlocking the ultimate performance from your sled
Traction is not overrated; it’s essential. A sled must hook up to deliver its potential. As a result, installing a special-application or high-performance track is the foundation for unlocking the ultimate performance from your sled.
In this article, I will guide you through the process of installing a new track, so you can make use of the best tracks the aftermarket has to offer. Often riders leave it to a dealer to swap out a track, rather than to attempt the work themselves. For most sleds, installing a track is not complex and does not require a mechanics certificate or special tools, but it does take some time, patience, and a little muscle. And in most cases, an extra set of hands doesn’t hurt.
Many riders opt for clutch kits, trail pipes, high-compression heads, lightweight muffler canisters — all worthy and noble mods. But all the horsepower in the world is useless if you cannot transfer it to the snow, and a wisely chosen high-performance track that’s matched to the machine, rider and conditions will yield huge dividends. Depending on application and performance goals, studs are often needed, but that’s something I won’t get into here.
A snowmobile is a three-contact-point vehicle – two skis and a track. The track, in particular, has a huge impact on performance, handling, and ride quality. Similar to the difference between an economy and super high performance street radial, a specialized high-performance track provides far better performance for most machines than many mass production standard-issue OEM tracks that must satisfy a wide range of riders and a variety of conditions.
Today, there’s a dizzying array of tracks available for high-performance trail, touring, utility, racing, and mountain riding from Kimpex, Camoplast, and others. If your stock track isn’t performing up to snuff or it has simply worn out, it’s virtually guaranteed that there’s a track to fit your needs. When shopping for a track, you can select from a variety of durometers (rubber hardness), plys (reinforcement mats inside the track), lug designs, lug height, pitches (if you want to change the drive sprockets), and window sizes. The design elements of the track you choose can significantly improve performance or better suit your sled or riding style.
Ultimately, the track is one of the most important safety devices on your sled because it greatly determines how well your sled brakes, accelerates and maneuvers. The right track on the right machine for the right conditions combines to make a sled that’s a joy to ride. On the flip side, the wrong track on the wrong machine for the wrong conditions can be flat out dangerous.
Within this article, I cannot provide a definitive guide for selecting every type of track for spectrum of sleds out there and the variety of applications. When shopping for a track, do your research, ask qualified professionals, and chose your track wisely. In addition, many riders select a track that has a taller lug than the original. If you select a taller lug track for greater penetration, you need to measure how much clearance there is between the track and bulkhead as well as the tunnel and track to verify that the machine will accept the chosen track. Once you’ve done this, check with an authorized dealer to make sure the particular track will fit your sled.
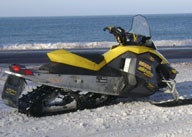
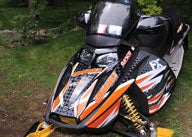
For this particular track swap, we’re installing a single-ply Camplast Cobra 1.352-inch track (Camoplast Part No. 9092) on a 2008 Ski-Doo TNT 500SS, which came equipped with a 1-inch Camoplast Ripsaw track. Our tunnel has plenty of clearance to accept this track, so that’s not an issue. While the stock Ripsaw provided good top-end performance and decent performance in soft snow, the track often broke traction and failed to hook up on hard pack and didn’t provide very good powder performance. The current crop of 1.25-inch tracks are preferred by many riders for exceptional penetration on hard pack performance while providing superior loose snow and off trail performance when compared with most 1-inch tracks. The lugs on my new Camoplast track are 1.352 inches tall. This appears to a taller track but in reality, small cones on the top of the lug add a bit of height to the lug, but the rest of the traction lug is 1.25 inches tall.
 The high-performance on/off trail Camoplast Cobra 1.352-inch track has been installed on the MX Z TNT and it’s been performing admirably.
If I am stating the obvious, forgive me, but before you dive into replacing the track, allow yourself enough room to remove the suspension track and a place to store some large parts. At the core of this project, you will have to remove the driveshaft, put in the new track, and then reassemble the parts. You’ll be separating the rear suspension from the sled and you’ll need some room to do that job.
Step 1 Remove Rear Suspension
 To remove the rear suspension, all you have to do is remove rear two hex bolts and front two Allen bolts that secure the suspension to the tunnel.
Many sleds have hex bolts securing the chromoly cross shafts to the tunnel. For the REV XP chassis, hex bolts secure the front arm while Allen bolts secure the rear arms to the brackets underneath the tunnel. There’s a couple of ways to remove the track. First method: Place a warmup stand or jackstand underneath the rear bumper to prop up the tunnel so the track is about six inches off the floor. Take all tension off the track by loosening the rear axle retaining bolts with a socket and ratchet. Then loosen the track tension lock nuts and turn the bolts counter clockwise on the track hangs way down. Use an Allen bit in a 3/8-inch drive and remove the bolt. Once both bolts have been removed the rear suspension will swing down because it will pivot on the front arm mount points.
To avoid placing any excessive stress on the tunnel mounting points, slip an automotive floorjack or some wood under the track and suspension. Remove one bolt from one side and then the other. Once the bolts have been removed and the suspension is no longer attached to the tunnel, lower the floor jack or remove the wood. Now the rear suspension will slide right out of the track. Second method: Tip the sled over on side panel and support it with a jackstand to the steering post. And simply remove the front suspension and the rear suspension bolts. Using this method, the tunnel supports the suspension as the bolts come off and tunnel is placed under undue stress.
Step 2 Remove Peripheral Parts
To remove the track, you need to remove the drive axle and before you remove the drive axle, you must remove the chaincase. However, you have other parts that prevent direct access to the chaincase. With The REV XP like many modern sleds, the muffler, the battery and battery tray are mounted aside the chaincase cover, and the muffler is right next to it. Using an exhaust spring puller, hook, pull and remove the two exhaust springs that secure the muffler to the pipe. Then hook and pull off the spring that secures the muffler to the chassis. Next unscrew the bolts that secure the battery cables to the battery terminals. Take off the battery strap and remove the battery tray. Swing the cables, relays and other parts out of the way, so you can get to the chaincase.
Step 3 Take Off Chaincase Cover
Remove the plastic filler plug on the top of the chaincase and put it away for later installation. Seven hex bolts secure the chaincase cover to the chaincase. Place an oil drop pan underneath the belly pan area of the chaincase and have a bunch of rags ready for removal of the cover. Use a socket and ratchet to remove bolts securing the chaincase cover and then wipe up the chaincase oil from the bellypan with the rags.
Step 4 Remove Chaincase Tensioner
Once the chaincase cover has been removed, loosen the locknut on the chain tensioner adjuster and then back off the adjuster bolt. Once there is adequate slack in the chain, unscrew the bolt that holds the tensioner arm to the chaincase. Keep the parts organized and clean for later reinstallation.
Step 5 Remove Chaincase Gears
Remove the hex bolt and washer that secures the upper gear to the jackshaft and use snap ring pliers to remove the lower gear retention circlip. Once both have been removed, slide both gears and chain off the drive and jackshafts. Organize parts and place them in a clean container for re-installation later. Lastly, slide the countershaft spacer off the jackshaft and place it with the other parts.
Step 6 Remove Disc Brake Guard Screws
Now turning to the other side of the sled, take the belt guard off. Next, unscrew the three screws that secure the disc brake guard to the chassis.
Step 7 Remove Caliper Bracket Screws
 The caliper bracket is removed using a socket with a Philips No. 2 head.
Rotate the driven pulley by hand until the brake disc slots align with the caliper bracket screws. Use a Philips screwdriver or socket driver to remove the screws securing the caliper bracket. Remove the bolt that mounts the caliper to the chassis and swing it out of the way. Use snap ring pliers to remove the circlip from the driveshaft and slide the disc off the shaft splines.
Step 8 Remove Driveshaft
Slide the driveshaft toward the chaincase and the driveshaft on the brake side will drop into the tunnel. A bearing flange is sandwiched between the driveshaft and the tunnel, be sure to remove these pieces and place in safe storage. Now the track will simply slide out from underneath the tunnel.
Step 9 Inspect Brake Components
Now is an excellent time to check all the brake components (caliper, lines and fittings) for any unusual signs of wear or damage. Inspect the driveshaft for any cracks or damaged welds and the sprockets for missing teeth or other damage. Rocks or debris sucked up in the track can significantly damage the drivers. Also, closely inspect all other components on the rear suspension. Replace the slides if they are too thin. Inspect each bearing by rotating each wheel. If you feel any binding or resistance, it’s a good idea to install a high-quality replacement bearing. Look closely at the suspension arms to see if there are any cracks, bends, or damage. Likewise, give the slide rails a good look over. If you ride aggressively, these aluminum extrusions can crack from time to time. Last but not least, with the rear suspension out, it’s convenient to hook up the grease gun to the zerk fittings and squeeze in several shots of grease.
Step 10 Install New Track
Slide the new track over the drive axle and align the drive lugs on the track with the sprockets or drivers on the axle. Once this has been completed, the installation of all the components is the reverse of the disassembly.
 The drive shaft is inserted through the new Camoplast Cobra track and the drive lugs are aligned with the drive sprocket.
Step 11 Install Drive Axle
 The driveshaft is inserted through the chain mounting bracket and into the chaincase.
Install the drive axle on the brake side of the sled. Align the bearing flange’s locking tabs with the notches in the tunnel. Make sure the mounting plate for the chaincase side is in place, and then slot the other end of the driveshaft in the bottom hole of the chaincase. Have a helper hold the drive axle in place while you slip the bottom sprocket on the drive axle, and top sprocket on the jackshaft with the chain around both gears.
Step 12 Mount Chaincase Parts
Using snap ring pliers install the circlip into the drive axle to retain the bottom gear. At this point, the drive axle should be solidly installed. Mount the chaincase tensioner to the chaincase with the hex bolt. Tighten chain adjuster bolt until there is very little freeplay in chain and then torque the lock nut to 27 ft-lbs. Torque down upper bolt and washer down over upper gear.
 The chaincase gears and chain are reinstalled back into the chaincase.
Step 13 Install Brake Rotor
Slip the brake rotor over the drive axle splines and use snap ring pliers to install the circlip. Line up the rotor and torque down the four caliper screws so the mounting plate on the other side of the tunnel is securely fastened.
Step 14 Install Brake Caliper
Slip the caliper over the rotor and align the mount hole to the mounting bracket on the chassis. Torque down the caliper mounting bolt. Install the brake disc cover using the three mounting screws. Install the belt guard.
Step 15 Install Rear Suspension
Install suspension by doing the reverse of the removal from above. Usually it’s easier to install the front torque arm first and rear torque arm second. Once the rear suspension has been installed and the tension has been properly adjusted, rotate the track by hand and inspect that there is no binding with the track or the chaincase.
Step 16 Install Chaincase Cover
Use a socket and ratchet to torque down the seven hex bolts to fasten the chaincase cover to the chaincase. Fill the chaincase with the desired chaincase lube through the upper fill hole. Remove the check plug on the bottom. When the fluid starts to run out, the chaincase is full and then reinstall the check plug. Then, press in the upper chaincase plug and breather into place on the chaincase cover.
Step 17 Install Battery and Parts
Install the battery tray, place the battery in the tray, and fasten the battery strap over the battery. Once this has been done, connect the battery cables to correct terminals.
Step 18 Install Muffler
Place the muffler into the proper position and use an exhaust spring puller to attach the muffler to the pipe and attach the spring to the muffler and bottom of the chassis.
Step 19 Start Up Sled and Adjust Track
Start up the sled, engage the clutches, and slowly turn over the track and be sure it is not coming in contact with any component. Tighten and align the track according to the manufacturer’s recommendations. You’ve just completed a track install, and you’re on the path to higher performance. A special thanks goes out to Bruce Schaapveld of B Line Control for making his heated shop available for the job and assisting me in this track swap.


 Your Privacy Choices