
How to Install Custom Handlebars
New bars can make a world of difference
Why spend time and money to replace something that already works? If you’ve never ridden a sled with really nice handlebars you’ve been missing out.
You’ll be surprised how things like seats, footwells and handlebars can make a huge impact on a rider’s impression of a snowmobile. It’s what we media types call “ergonomics” and handlebars are one of the most important aspects of a sled’s ergonomics.
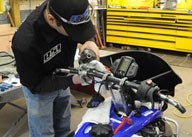
Yamaha has pretty nice handlebars, but the Phazer in this story was being set up for cross-country racing and needed some bars its rider could live with for 500 miles of the roughest riding most people would ever do. The sled was taken to RSI Racing where RSI’s Rob Schatzle installed a set of RSI’s carbon fiber tapered race bend handlebars, an RSI riser, RSI hi-power grip heaters, RSI gel grips and an RSI braided brake line. Follow along as we walk you through the install.
 Rob Schatzle cut his teeth wrenching at snowmobile and Jet Ski races. These days he spins wrenches for the Hentges Racing snocross team on the ISOC National circuit is also the owner of RSI Racing. Who better to install the bars on our sled? Rob starts by removing the stock controls. Yamaha controls are two-piece and simply clamp down over the bars with Phillips head screws. Most sleds are like this for ease of assembly at the factory.
 The stock handlebar pad is removed along with the handlebar clamps. The RSI bars require an RSI riser but we’ll still need to use these clamps because they will be used to bolt on the riser.
 Here’s how it will look once the stock bars are removed. It’s OK to simply let the stock controls hang down against the sled; doing this won’t damage them.
 The RSI riser bolts onto the stock handlebar riser using the stock clamps.
 Make sure the base for the RSI riser is centered in the stock riser. This is important as everything fits pretty tight once it’s all put together. Plus, you really don’t want your bars off-center.
 The clamps for the RSI riser are slid on and tightened down. The riser is adjustable so the bars can be moved forward or back. Even with this riser they will still be right about stock height since the stock bars had a rise built into them. Remove the clamps on top of the riser, place the bars in the clamp, center them up and tighten them down. The RSI bars are tapered like a motocross bar to help prevent rider fatigue. The center of the bar is about twice the diameter of the grip area.
 Re-install the brake lever and master cylinder assembly.
 Re-install the throttle lever and kill switch assembly.
 Things are looking good, but we’re not done yet. It’s hard not to admire the look of the carbon fiber bars. RSI sells this same bend in lightweight titanium but they cost about $900 more. Maybe next time.
 RSI sells its own handwarmer elements that are designed to work with the hooked bars and cover the entire grip area. This means no cold spots when your hand lingers on the outside of the bar for a while. This is nice when it’s -20 Fahrenheit.
 Once the handwarmers are in place they get wrapped with electrical tape. The electrical tape will hold them in place but won’t affect their performance.
 Our bars are getting closer to being finished. It’s important to take a step back from your work every once in a while just to give it a once over. Sometimes you can’t see something you may have missed until you look at the whole picture.
 The new handwarmers get spliced into the stock handwarmer wiring. When it’s all done the handwarmers will work just as they did from the factory using all the stock switches. Pretty slick.
 Slide some shrink wrap over the wires then twist them together. You need to slide the shrink wrap on now because once the wires are together you won’t be able to do it. You can either use a wiring diagram or a test light to see which wire is hot coming off the sled. Hook that one to the red wire on the handwarmer element.
 solder connections on a snowmobile. For about $20-30 you can buy a soldering gun and with about five minutes of practice you can solder with the best of them. Snowmobiles go through all different types of vibrations and impacts out on the trail and the last thing you want is the wiring for your handwarmers coming apart. No handwarmers = misery. Use a wet towel to catch any molten solder that may fall during the soldering process.") Don’t use crimp fittings or wire nuts to connect the wires. Always (always) solder connections on a snowmobile. For about $20-30 you can buy a soldering gun and with about five minutes of practice you can solder with the best of them. Snowmobiles go through all different types of vibrations and impacts out on the trail and the last thing you want is the wiring for your handwarmers coming apart. No handwarmers = misery. Use a wet towel to catch any molten solder that may fall during the soldering process.
Don’t use crimp fittings or wire nuts to connect the wires. Always (always) solder connections on a snowmobile. For about $20-30 you can buy a soldering gun and with about five minutes of practice you can solder with the best of them. Snowmobiles go through all different types of vibrations and impacts out on the trail and the last thing you want is the wiring for your handwarmers coming apart. No handwarmers = misery. Use a wet towel to catch any molten solder that may fall during the soldering process. Slide the shrink wrap up over the newly soldered connections and use a heat gun to shrink it, sealing the connection. You can also wrap a little electrical tape around it just to be sure.
 Now is a good time to do things like install a new RSI braided brake line, which is why we’re sucking all the fluid out of the master cylinder. When we take the old line off we don’t want all the brake fluid running all over the sled. Brake fluid is somewhat caustic and will wreck painted surfaces. Plus, it’s just messy.
 The old line is unbolted from the master cylinder and the caliper and pulled from the sled. You’ll have to remove the side panel to get at the brake. Take note of how the line is routed through the sled because that will probably be the best way to route the new line.
 Run the new line up to the master cylinder and bolt it on. The line uses a banjo bolt that’s hollow, so don’t tighten it too much or you’ll break it. Re-use the old copper washers. Bolt the line onto the caliper the same way.
 Fill the master cylinder then bleed the brakes. The best way is to use a vacuum bleeder. Like the soldering gun, you can buy one of these for about $30 at an auto parts store. If you do any of your own maintenance it’s a guarantee you will use it again so it’s money well spent. Bleed until you don’t see any more air bubbles coming out of the bleeder screw in the caliper.
 Make sure you don’t bleed the master cylinder dry while you’re bleeding the brake. It doesn’t hold much, so it’s easy to do. If you suck it dry you’re basically starting the bleeding process over. When you’re done, fill the master cylinder to the full line.
 Check the operation of the brake. The lever should be firm, not spongy. It’s best to check the brake again on a warm-up stand before you ride, too. The RSI braided line doesn’t expand like the stock rubber line, so the brake will be firmer and more precise.
 Re-install the master cylinder cover.
 Install the rest of the controls. They simply screw together.
 Start the sled and check to see if the handwarmers are working. Once the handgrips go on you won’t be able to mess with them so now is the time to fix them if for some reason they’re not working.
 RSI gel grips are basically a kind of rubberized tape. To install them you simply peel off the backing and wrap them around the bars. The harder you pull, the thinner they go on so you can make your grips as thick or thin as you want. We went kind of halfway with ours and they were perfect.
 Rob finishes off the grips by wrapping them with electrical tape. During the season the electrical tape came off and they got re-done with black duct tape.
 The finished product. We can honestly say these were some of the best handlebars we’ve ever used. Traditionally, the first race of the year results in wicked arm pump, probably the result of being nervous and excited more than anything. With the RSI bars we never got arm pump. The bend and the hooks were just about perfect and we really liked the grips.
Do It Yourself — If you want to do a similar custom setup, here’s a parts list with pricing:
• RSI Carbon Fiber Tapered Handlebars, Race Bend: $119.95 • RSI Handlebar Riser: $69.95 • RSI Hi Power Grip Heater Elements: $49.95 • RSI Extended Length Braided Brake Line: $49.95 • RSI Grip Wrap Gel Grips: $19.95
All parts can be purchased via RSIRacing.com.


 Your Privacy Choices