
How To Install a Snowmobile Graphics Kit
Sled wraps are easier to apply than you think
In this modern world of snowmobile manufacturing one can order different graphic packages directly from the factory. Usually with the spring order, OEMs are making this process easier than ever before for customers to get a personalized custom look for their new sled. You’ll find that the sled makers offer different options and good choices finished off in a custom look to satisfy different tastes. Plus, factory-installed graphics are virtually perfect in fit and finish, offering quality that will provide years of service.
But what if you have an older sled or didn’t make a purchase decision early enough to take advantage of a manufacturer’s early season special? What customization options do you have then?
Not to worry, as there is a whole world of suppliers and opportunities out there, people that can help you dial in a new look for your ride. This process is a lot easier than you would think. Aftermarket graphics packages add another dimension for the consumer and can offer a different and refreshed look over your sled’s stock styling.
How to Set Up Your Sled’s Suspensions
As noted, you don’t need to have a new sled to give it brand new persona. In this project, after 10 years looking at his sled’s stock graphics, the owner wanted something different – a new look for his tired looking steed. While the thought of giving the sled a facelift seemed daunting, the actual process proved much easier and took less time than expected.
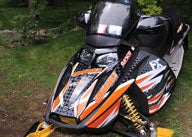
 Our project sled – before and after.
Graphics DYI
To prove our point we offer the following step-by-step process of how to install your own graphics.
Looking online at several different graphics option, one soon can get lost and confused with so many different ideas that are available. We suggest that you make some notes as you go, so you can find your way back to the one you like the most.
We found the following graphics at ArcticFXGraphics. This graphics company has been around since 2004 and has had lots of time to perfect its process. After choosing the graphic we liked the most, we also changed the colors around. This company can modify or change anything within their graphic, such as add your name, making your graphics kit truly custom. The order process did not take long and neither did the delivery. So let’s get started with the install!
 Our order also included the application kit, which we highly recommend.
 For easy handling, the graphics kit comes on a roll to help keep things organized.
There are not many tools required for this job, but you will need a heat gun or hair dryer. You’ll also want a sharp or new razor blade knife for trimming, masking tape, scissors, paper towel and the application kit. Seriously, that’s all you need. But, it is important that this process be done at room temperature.
The first job and the most time consuming is the removal of the old graphics. Since the OEMs use a quality graphic, their system really sticks so removal is tedious. This is where the heat gun comes in, with a little heat on the graphic, this will make removal easier. But be careful! There is the potential for heat damage, as the panel underneath the graphic is plastic and plastic melts with heat. The best way to monitor your heat is touching the graphic, if it’s too hot to touch, then it’s too hot for the plastic. Once you set the right amount of heat, use a squeegee like a scraper to help the process along.
 Use the heat gun in a circular motion to spread the heat over a larger area.
You will find that this removal job gets easier with a little practice. After removing the graphics, there will be a glue residue left behind; this glue is tough to remove, so using the right product here is important. The application kit includes a glue removal spray that works really well, but if you do not have this, there is another product called Goo Gone, which is available at any hardware store and it will not damage any plastic surface. Do NOT use any type of solvent on any plastic surface, as solvent will damage the plastic.
How to Improve Your Snowmobile Trailer
When using this spray, keep the surface wet by spraying often and leave the spray on for at least three to five minutes before removing the glue. Use a squeegee to scrape off the majority of this gooey mess and then follow up with some paper towel.
 Keeping the spray wet before trying to remove the glue is key.
Once all the glue is removed follow up with a wax and silicone remover or a good wash with water and detergent. Make sure the plastic surface is really, really clean to ensure that the new graphics will have a smooth and clean surface to adhere, so they can stick well.
Graphic Installation Tips
There are two types of plastic surfaces on today’s sleds, a smooth surface and a rough surface. The smooth surface is the surface that is shiny like a car’s painted surface, while the rough surface is not high gloss and has some texture, like most belly pans. There are two application methods for these two surfaces, a dry method for rough surfaces and a wet method with soapy water for glossy surfaces. The rough method is simple, so we will start with the rough surface on the sides.
 We started with the side first; shown here are two pieces that fit well.
Tip: This dry method allows the graphic to stick better to the rough surface here.
Tip: Install the graphics with the panels on the machine. This allows you to work on the panel so it doesn’t move around, but even more important is that the installer can work continuously with the graphic alignment.
 Notice the bottom cowl line. We used this line as a guide to lay out the graphic for a perfect fit.
Make sure that your hands are clean, so you do not contaminate the sticky side of the graphic. Pick a corner to start the graphic, and then lay it out across the panel by using your fingers. If there is an air bubble that occurs, peel it back past the air bubble and work it again. Try to keep the graphic air bubble free as you lay out the graphic. Once you are happy with the graphic install, you can apply some heat. This step is optional, we did find that a little heat made the graphic lay out better on tight corners and made some of the fine wrinkles disappear.
 When using a heat gun, be cautious, as the heat will make the graphic shrink.
Like shrink wrap and shrink tubing for electrical work, graphics will also shrink a small amount. Be careful with this step, just use a small amount of heat here, if it’s too hot, it will damage the graphic.
 We highly recommend this application kit, because of this tool, the felt squeegee tool, which can be hard to find. It’s easy to use and does NOT scratch the graphic surface. It’s awesome!
 Smooth surface application.
Start the smooth surface application by making sure that the surface is really clean. Now using soapy water or the application fluid that comes in the kit, liberally spray on the shiny sled surface and the sticky side on the graphic. It’s okay to have the fluid dripping. Place the graphic on the desired surface and move it around into position. The graphic will float on the application fluid. Once in position, start to squeegee the water out from the center of the graphic and work your way out, in all directions.
How to Install an Aftermarket Track
Be careful not to trap any fluid in the center, as this will be difficult to remove later. The fluid bubbles are much like air bubbles talked about in the rough surface application.
 Trim the graphic away from any edges, leaving at least ¼-inch back from all edges.
Now that the graphics have been installed it’s a good time to trim some of the graphics edges. Arctic FX does a great job on its fit, but there is always a need for trim. Using a razor knife, trim the graphic away from any edges, leave at least ¼-inch back from all edges. This gives it a better appearance or more professional look and the graphic will not get caught on anything and peel back.
Now is the time to take a step back and enjoy the new look. It’s amazing what a big difference this graphics package makes with such a small amount of input. Enjoy the look and enjoy the ride!
 Even the smallest of sleds like this Yamaha SRX 120 have graphic options.


 Your Privacy Choices