
How to Properly Break-In Your Snowmobile Belt

Follow these steps to break in your belt so it lasts as long as possible
Before anyone gets the impression this article is about once again fitting into that Ski-Doo or Polaris themed pants belt they got as a present two decades ago, there will be no weight-loss tips in the next few paragraphs. You’re on your own for that challenge.
What we will cover, however, is how best to break in a new drivebelt in your snowmobile. Like it or not (and most of us don’t) that infamous rubber belt is currently the preferred way for the world’s snowmobile manufacturers to help funnel power from the rig’s engine to its track. Until someone builds a better – or at least decently cost-effective – mousetrap, we have to deal with the wretched things.
But here’s the good news: a few moments’ care and attention during the installation of a new snowmobile belt will extend its service life by a considerable amount. This means there’s less chance of being stranded thanks to a shredded belt, a situation which Murphy’s Law states is sure to happen in the least convenient of locations. The old saying that an ounce of prevention is worth a pound of cure definitely applies in this instance. At the very least, expending the effort now is likely to save a world of headache in the future.
The fastest way to wreck a new belt is to simply install the thing in a cold environment (where snowmobiles tend to be operated, after all) and take off at wide-open throttle. Fresh belts need a moment to acclimate to their new duty and settle into their duty cycle. In other words, a pinch of mechanical sympathy can go a long way to making life easier in the future.
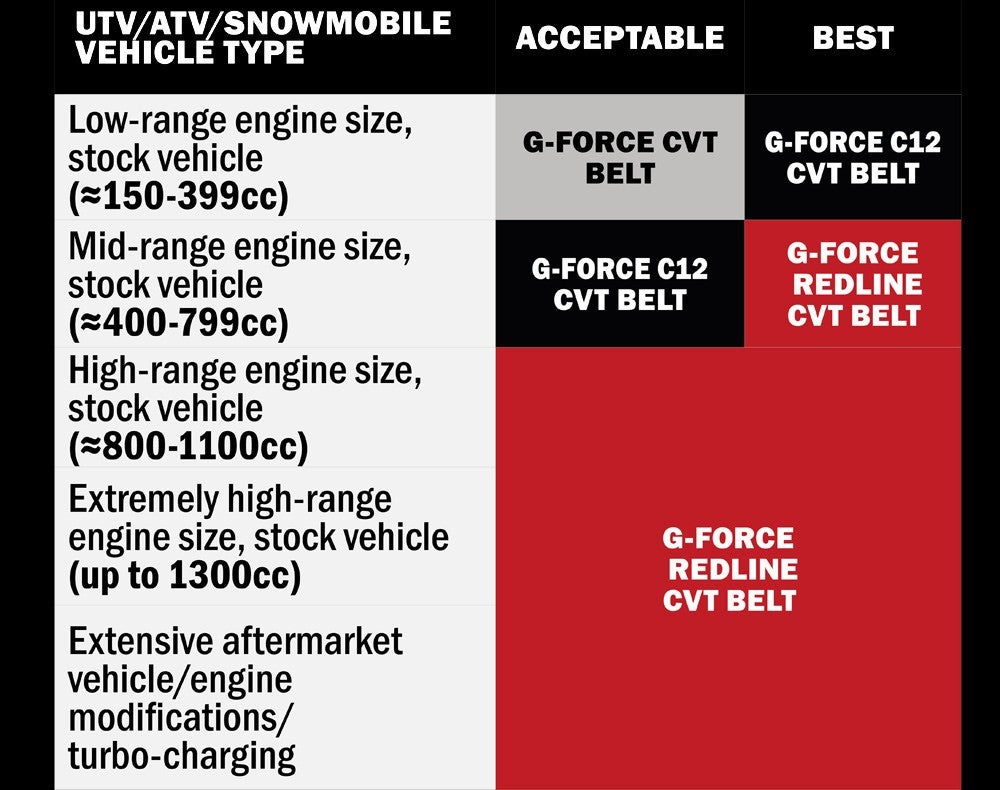
First, make sure to choose the right belt. Just because the belt your buddy has on hand for his machine is almost the right size doesn’t mean it’s going to work properly. Or at all. A belt that’s even just slightly out of OE spec can cause wildly unpredictable performance and odd behaviour. Gates, who has been supplying snowmobile parts for many years, has an entire line of belts which are specifically designed for certain applications. For example, the basic G-Force CVT belt is good for vehicles with engines up to 399cc in size, such as kid-sized sleds or that old single-cylinder Elan 12 that’s been moldering in your grandfather’s shed.
Gates also has its G-Force C12 CVT belt, recommended for machines packing up to 799cc of displacement. If you’re rocking a Tundra 600 for work duties or a Polaris Indy for gentle trail cruising, this belt is a good choice. The mid-range C12 a reliable pick to have on hand for replacement duties.
For our speed freak readers who hold the keys to a snowmobile with greater than 800cc engine displacements or have carried out extensive aftermarket mods, be sure to pick up a Gates G-Force Redline CVT belt. This is a properly robust beast of a belt designed to take on the most demanding riding environments, including high RPM blasts and extended top speed runs across a frozen lake.
Belt Break-In Routine
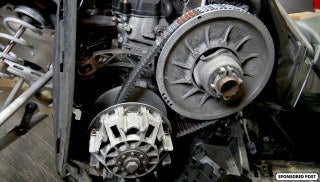
It’s important to know that Gates uses a proprietary laser measuring system when producing their product. This assures a proper fit right out of the package. And speaking of packages, it is important not to manhandle the new belt before fitting it to your snowmobile. Twisting the thing into new and interesting shapes is a sure-fire way to introduce unnecessary stress and premature wear. Doing so while the belt is cold and rigid amplifies this problem.
By the way, once you’ve selected the right belt, be sure to install it in the proper manner on your machine. Follow the instructions, take your time, and take it to a pro if you don’t know what you’re doing. We covered the common reasons why powersports belts fail in a previous post, with improper installation being at or near the top of that list.
To help you make sure your Gates belt lasts for many seasons of use, Gates put together a handy guide to belt break-in, which we expand on below.
Hopping on your sled and going full throttle right away is NOT how you should break in your new belt.
Once the new belt is on your machine, it is critically important to put it through a couple of heat cycles. During your first drive after belt replacement, take the belt up to operating temperature by driving the rig a bit more gently than your normal pace for about 20 or 30 minutes. Be sure not to exceed three-quarter throttle at this point and vary your speed between 20 and 45mph. Yeah, we know – that’s a tough requirement for us, too. And the colder it is when you replace the belt, the longer you should drive at this pace; add about 10 minutes to this suggestion if air temperatures have sunk into the negatives. After this, park the machine and let it sit for about half an hour.
Why are we doing all this break-in work? Thank physics. Rubber belts need to precisely match its pulley angles in order to maintain a proper grip. Otherwise, riders will end up with a belt that slips more than an Arizona resident during their first encounter with ice. A belt that’s improperly broken in may not seat properly in the groove, leaving small voids of space between it and the pulley. This can cause slippage and premature failure. Gates G-Force RedLine belts have been proven to last up to three times as long as belts from competing brands when properly installed and broken in, meaning sticking to these steps will likely save you future hassle.
If you really want to be sure, run the snowmobile through another driving sequence like the one described above, making for a pair of break-in trips lasting about 20 minutes each with an equivalent cool down period in between. This double dose of caution will help extend the belt’s life right from Day One. After letting the rig rest for another few minutes, go ahead and safely give it the beans on an open trail.
Visit Gates.com for more information.
Sponsored by Gates


 Your Privacy Choices