
Track Studding the Right Way
This fairly easy do-it-yourself project has to be done the right way
Most people are running too many studs in their tracks. While studs provide traction, the traction they provide is threefold – traction for acceleration, traction for turning and traction for braking. While more studs can provide more traction, they also add weight to the track and affect a sled’s top speed.
With how well studs and tracks are made these days, unless you’re an ice racer you probably don’t need more than 144 studs no matter what sled you’re riding. The key is to know where and how you ride, what you’re riding and to install the studs correctly. Read on as we put 104 of Stud Boy’s finest in our Arctic Cat Sno Pro 500 cross-country racer.
We picked up our stud package from http://www.studboytraction.com/. Here’s a list of the tools you’ll need for this project: * Tape Measure * Paint Marker * Track Cutting Tool * Hex/Allen Bits * Cordless Drill * Socket Set
Shop For Snowmoible Track Studs
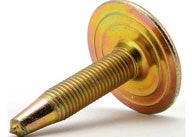
, track cutter and studding pattern.") Here’s the traction setup from Stud Boy. It consists of 104 1.375-inch Stud Boy Power Point +PLUS studs, SuperLite +PLUS backers, Power Tower .750-inch locking aluminum nuts and a set of 7.5-inch Shaper wear bars. I like a lot of carbide on my sleds so I usually shoot for somewhere in the 6-9-inch range for carbides. The Stud Boy Shapers are pretty aggressive and that’s why I like ‘em. The kit also comes with a track marker (paint pen), track cutter and studding pattern.
Here’s the traction setup from Stud Boy. It consists of 104 1.375-inch Stud Boy Power Point +PLUS studs, SuperLite +PLUS backers, Power Tower .750-inch locking aluminum nuts and a set of 7.5-inch Shaper wear bars. I like a lot of carbide on my sleds so I usually shoot for somewhere in the 6-9-inch range for carbides. The Stud Boy Shapers are pretty aggressive and that’s why I like ‘em. The kit also comes with a track marker (paint pen), track cutter and studding pattern. Your first step should be to remove the belt. During the studding process you’ll have to spin the track a bunch and you’ll never be able to do it with the belt on.
 Lay out an old blanket, piece of carpet or cardboard and flip your sled on its side. Your sled will be getting moved around a lot while on its side and you don’t want it to get scuffed up on the shop floor. A moving blanket works nicely for this.
 The directions in the Stud Boy studding pattern tell you to measure in from the outer edge of the track to determine stud placement. All the studs will go down the center belt. Some guys like to use studs in the outer belt because they think it helps the sled handle better on ice, but for cross-country we could find guys who would debate that, one is named Kirk Hibbert, famed Arctic Cat cross country racing legend.
 I placed the first backer where the measurements told me to then I stuck the tip of the paint pen through the hole in the backer to mark the track.
 Hold the backer in place and mark your track.
 See that yellow dot? That’s where your stud will go.
 Here’s your best friend when you’re studding the track: the track cutter. I use a cordless drill, but you can use an air drill or a corded drill too.
 Place the track cutter over the paint mark, apply some pressure and pull the trigger.
 Here’s why the track cutter is such a valuable tool for studding — it leaves a nice, round hole. You’d never get this with a drill bit. There’s no need to cauterize the track like the old-timers used to do. Here’s why the track cutter is such a valuable tool for studding — it leaves a nice, round hole. You’d never get this with a drill bit. There’s no need to cauterize the track like the old-timers used to do. |
 Push the stud through the hole. You’re guaranteed to have a sore thumb by the time you’re done. Think of it as exercise for your throttle thumb.
 Here’s the stud in its new home.
 Place the backer on the stud. I used Stud Boy’s lightweight SuperLight +PLUS plastic backers and alternated green and white just to be different. The Stud Boy +PLUS series are designed for single ply tracks like this Camoplast Cobra. Place the backer on the stud. I used Stud Boy’s lightweight SuperLight +PLUS plastic backers and alternated green and white just to be different. The Stud Boy +PLUS series are designed for single ply tracks like this Camoplast Cobra. |
 Thread the nut on the stud. We used Stud Boy’s Power Tower self-locking nuts so there’s no need for Loctite. These won’t come loose.
 The best way to tighten the studs onto the track is to get a socket with a hex or Allen head that is sized to fit the T-nut part of the stud. This will hold the stud and keep it from spinning while you tighten the nut down. I use the same cordless drill I used to cut the holes in the track fitted with a deep well socket to tighten the nut down. The best way to tighten the studs onto the track is to get a socket with a hex or Allen head that is sized to fit the T-nut part of the stud. This will hold the stud and keep it from spinning while you tighten the nut down. I use the same cordless drill I used to cut the holes in the track fitted with a deep well socket to tighten the nut down. |
 With the single ply Cobra track it’s critical how much you tighten the studs down. You only want to go until the T-nut part of the stud is flush with the track — and no more! The cordless drill helps here because you can really control the speed. Congratulations! You’ve just installed a stud. Only 103 more to go…
 The studs are installed in a v-shaped pattern down the center belt and each one is a quarter-inch farther inside the track than the next. The pattern repeats every six studs. Once I started measuring I realized that each little “scale” in the Cobra track equaled a quarter inch, so it made it easy for me. I just double-checked the placement each time to make sure I wasn’t in the wrong spot and went for it, placing each stud a scale’s width inside of the last one.
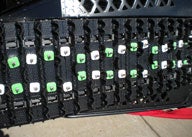
 Here’s what the stud pattern looks like when it’s all said and done. Here’s what the stud pattern looks like when it’s all said and done. |
 Once you’re done you’ll have to try and sweep up all the little track nubbins that fall on the floor. They’re hard to sweep up because they like to roll under the broom. I find them in the shop all year round.
While this story might seem like it’s overanalyzing, how you stud your track can really make a difference in how both it and your sled perform. Studding a track is simple work, but sometimes even simple work takes a little thought to do it right. How good a job did I do? This sled has over 1,000 miles on it with almost 600 of those miles logged in cross-country racing (500-some from the USCC Red Lake I-500) and all the studs are still there. Races are won because the racers paid attention to the details. Maybe you should too?
We are committed to finding, researching, and recommending the best products. We earn commissions from purchases you make using the retail links in our product reviews. Learn more about how this works.
Related Reading How to Install Custom Handlebars How to Install an Aftermarket Track


 Your Privacy Choices