
Ski-Doo’s Soft Tunnel Bags for XP Sleds
Much needed storage for your XP
The stock XP-chassis MX Z’s storage capacity is limited at best, but fortunately, Ski-Doo’s parts and accessories division offers a number of full-featured cargo bags that conveniently attach and detach from the tunnel. In order to offer a better bag, Ski-Doo has developed a unique, functional, and attractive cleat retention system that makes its latest bag look like an integrated piece on the sled, and not some clunky out of place add-on.
Recently, I had the opportunity to use a Soft MX Z Tunnel Bag on the MX Z TNT. The Tunnel Bag comes with a strap and hardware kit to install the cleat system. Clear, concise instructions with illustrations allowed me to install the bag in about 20 minutes. It’s a really simple procedure that almost anyone can do with a drill, a ¼-inch bit, a Torx driver, and some pliers. The kit contains a unique hexagonal tunnel cleat or anchor that once installed looks like a factory piece, but better yet, it firmly secures the tunnel bag, and there are no unsightly or inconvenient hooks.
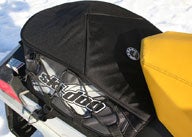
 Ski-Doo’s soft MX Z Tunnel Bag fits neatly between the seat and taillight assembly and provides 5-1/2 gallons of storage capacity.
Easy D-I-Y
First, I located the two sets of stamped ‘X’ marks on the tunnel. These marks designate the position of the holes that need to be drilled for the four cleats. I positioned the bag on the tunnel to verify that middle ‘X’ would neatly position the bag between the back bevel of the seat and the taillight. Next, following the instructions, I drilled a ¼-inch hole in the tunnel. Since the drill mark is close to the top of the tunnel, I didn’t have to worry about drilling into the track or any other component. Using a medium size Torx screwdriver, I drove the Torx screw from the inside of the tunnel and to fasten the hex head anchor on the outside of the tunnel. I use pliers to keep one point of the hex cleat facing up, so it was in the correct position for anchor catch/retaining strap. I completed the same procedure for the three other anchors and I was ready to strap the bag to the tunnel.
Contoured Bag
The contoured profile bag neatly nestles between the seat and taillight assembly on the top of the tunnel. It measures about 21 inches long by 13 inches wide by 6 inches deep for a 5-1/2 gallon capacity. It’s constructed of a tough nylon outer shell with rubber/foam structure for support. A retention cord attaches to nylon tabs at the top and the bottom of the bag, and the tabs at the bottom of the bag connect to the nylon retaining straps. On the inside bottom of the bag, there’s a convenient zippered pocket for storing smaller items, such as keys and maps, which you don’t want loose inside the larger main compartment.
 The MX Z Tunnel Bag is large enough to hold your essential items, and the innovative cleat system keeps the bag firmly secured to the tunnel.
 The nylon strap with the clasp easily slides over the cleat so the bag stays firmly attached to the sled.
Without the tunnel bag, I found myself stuffing my jacket and bib pockets full of the items (energy bars, water, assorted tools, tape, and even oil) for a trail ride. What a pain! Yes, I know I could ride with backpack, but I rather not use a backpack because it restricts my arm movements. Besides, I don’t want to carry the weight of this gear; I want the sled to carry the weight. And if you’re going to rack up 300 miles or more in a day, a heavy backpack isn’t much fun to wear.
With the tunnel bag, I had plenty of room for screwdrivers, ratchet and sockets, locking pliers, beverages, food, trail maps, etc. Now I was able to bring along more gear than I actually needed. If the bag wasn’t full, I could easily cinch down the straps to secure the bag’s contents. The bag carried more gear than I expected and would serve well as overnight bag for long distance point-to-point trips.
Cleat System
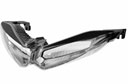
 The cleat attaches to the tunnel with Torx screw, keeps the bag fastened to the sled and looks stock.
In my opinion, the best feature is the stout cleat system. In comparison, some generic tunnel and saddlebag systems use a nylon strap with a female buckle that secures to the tunnel with a few pop rivets. This system looks home-brewed and non-stock, and doesn’t seem as sturdy. The Ski-Doo cleat is about ½-inch in diameter and kept the bag securely fastened to the tunnel. No matter how much gear was packed inside, I could securely tighten the nylon straps and I never felt like it would work loose when riding down the trail. But just as impressive, the innovative retention system uses nylon straps with covered clasps that slide over the cleats for a clean upscale look. And this cleat/cover clasp setup prevents riders from snagging clothing or other gear. In addition, I was also able to quickly install and release the nylon retention straps, so I could grab the bag by the carry strap and take it inside during trailside stops.
The MX Z Tunnel Bag is available in Soft and Semi-Rigid versions for REV-XP, REV-XR, and REV RT chassis. The Semi-Rigid bag for XR and XP retails for $103.49, the Soft bag for XP and XR is offered at $89.99 and the bag for RT 121-inch chassis goes for $76.99. The full selection of Ski-Doo bags is available from BRP at http://www.ski-doo.com/ or through any authorized Ski-Doo dealer.
Related Reading PowerMadd Cobra Windshields for Ski-Doo XP Traction Considerations Aftermarket Ski Options


 Your Privacy Choices